Installation on RedHat/CentOS
Organization
LemonLDAP::NG provides these packages:
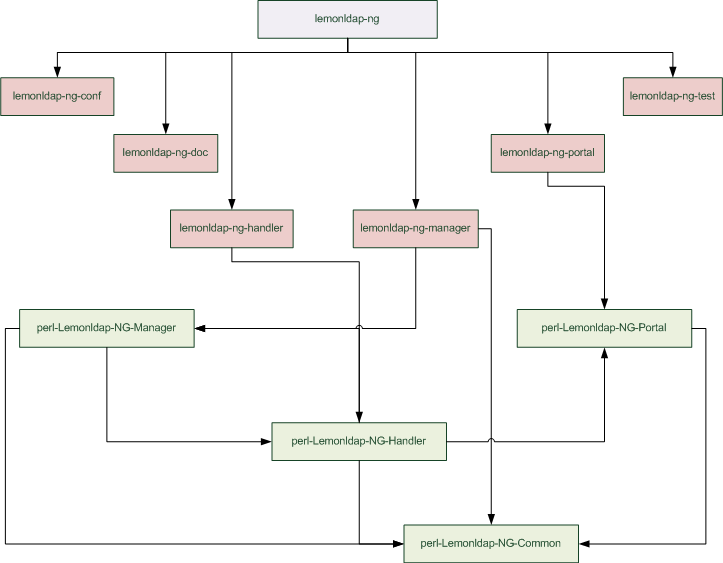
- lemonldap-ng: meta-package, contains no file but dependencies on other packages
- lemonldap-ng-doc: contains HTML documentation and project docs (README, etc.)
- lemonldap-ng-conf: contains default configuration (DNS domain: example.com)
- lemonldap-ng-test: contains sample CGI test page
- lemonldap-ng-handler: contains Apache Handler implementation (agent)
- lemonldap-ng-manager: contains administration interface and session explorer
- lemonldap-ng-portal: contains authentication portal and menu
- perl-Lemonldap-NG-Common: CPAN - Shared modules
- perl-Lemonldap-NG-Handler: CPAN - Handler modules
- perl-Lemonldap-NG-Manager: CPAN - Manager modules
- perl-Lemonldap-NG-Portal: CPAN - Portal modules
This schema shows the dependencies between modules:
Get the packages
YUM repository
You can add this YUM repository to get recent packages:
vi /etc/yum.repos.d/lemonldap-ng.repo
[lemonldap-ng]
name=LemonLDAP::NG packages
baseurl=http://lemonldap-ng.org/rpm/
enabled=1
gpgcheck=1
gpgkey=file:///etc/pki/rpm-gpg/RPM-GPG-KEY-OW2
baseurl=http://lemonldap-ng.org/rpm6/
Run this to update packages cache:
yum update
rpm -Uvh http://download.fedora.redhat.com/pub/epel/5/i386/epel-release-5-4.noarch.rpm
See prerequisites and dependencies chapter for more.
Manual download
RPMs are available on the Download page.
Package GPG signature
The GPG key can be downloaded here: rpm-gpg-key-ow2
Install it to trust RPMs:
rpm --import rpm-gpg-key-ow2
Install packages
With YUM
If the packages are stored in a yum repository:
yum install lemonldap-ng
Transaction Summary
===================================================
Install      82 Package(s)
Upgrade       0 Package(s)

Total download size: 18 M
Is this ok [y/N]: y
You can also use yum on local RPMs file:
yum localinstall lemonldap-ng-* perl-Lemonldap-NG-*
With RPM
Before installing the packages, install all dependencies.
You have then to install all the downloaded packages:
rpm -Uvh lemonldap-ng-* perl-Lemonldap-NG-*
lemonldap-ng-portal, lemonldap-ng-handler or lemonldap-ng-manager.
Install the package lemonldap-ng-conf on all server which contains one of those packages.
ln -s /usr/lib/perl5/vendor_perl/5.8.8/Lemonldap /usr/lib64/perl5/
ln -s /usr/lib/perl5/vendor_perl/5.8.8/auto/Lemonldap /usr/lib64/perl5/auto/
First configuration steps
Change default DNS domain
By default, DNS domain is example.com. You can change it quick with a sed command. For example, we change it to ow2.org:
sed -i 's/example\.com/ow2.org/g' /etc/lemonldap-ng/* /var/lib/lemonldap-ng/conf/lmConf-1 /var/lib/lemonldap-ng/test/index.pl
Apache virtual host
If LL::NG is the only software installed in Apache, the virtual host feature may not have already been activated.
To do it, uncomment the NameVirtualHost line in /etc/httpd/conf.d/z-lemonldap-ng-handler.conf:
NameVirtualHost *:80
Check Apache configuration and restart:
apachectl configtest
apachectl restart
Reload virtual host
To allow the manager to reload the configuration, register the reload virtual host name in the hosts of the server:
echo "127.0.0.1 reload.example.com" >> /etc/hosts
Upgrade
If you upgraded LL::NG, check all upgrade notes.
For apache configuration, you may have to remove the old symbolic link, if not done by the RPM:
rm -f /etc/httpd/conf.d/z-lemonldap-ng.conf
Your old Apache configuration should have been saved, you need to port your specificities in new Apache configuration files:
vi /etc/lemonldap-ng/apache2.conf.rpmsave
The upgrade process will also have migrate old configuration files into /etc/lemonldap-ng/lemonldap-ng.ini. This includes the application list which is now set in the applicationList parameter from [portal] section, for example:
[portal]
applicationList={ 'Menu' => { type => 'category', 'Example' => { type => 'category', 'test1' => { type => 'application', options => { name => 'Application Test 1', uri => 'http://test1.example.com/', description => 'A simple application displaying authenticated user', logo => 'wheels.png', display => 'auto',  }, },'test2' => { type => 'application', options => { name => 'Application Test 2', uri => 'http://test2.example.com/', description => 'The same simple application displaying authenticated user', logo => 'wheels.png', display => 'auto',  }, }, },'Administration' => { type => 'category', 'manager' => { type => 'application', options => { name => 'WebSSO Manager', uri => 'http://manager.example.com/', description => 'Configure LemonLDAP::NG WebSSO', logo => 'tools.png', display => 'on',  }, },'sessions' => { type => 'application', options => { name => 'Sessions explorer', uri => 'http://manager.example.com/sessions.pl', description => 'Explore WebSSO sessions', logo => 'tools.png', display => 'on',  }, }, },'Documentation' => { type => 'category', 'localdoc' => { type => 'application', options => { name => 'Local documentation', uri => 'http://manager.example.com/doc/', description => 'Documentation supplied with LemonLDAP::NG', logo => 'docs.png', display => 'on',  }, },'officialwebsite' => { type => 'application', options => { name => 'Offical Website', uri => 'http://wiki.lemonldap.objectweb.org/xwiki/bin/view/NG/Presentation', description => 'Official LemonLDAP::NG Website', logo => 'web.png', display => 'on',  }, }, }, }, }
applicationList parameter from /etc/lemonldap-ng/lemonldap-ng.ini.
DNS
Configure your DNS server to resolve names with your server IP.
example.com, launch the following :
cat /etc/lemonldap-ng/for_etc_hosts >> /etc/hosts
Follow the next steps
File location
- Configuration is in /etc/lemonldap-ng
- LemonLDAP::NG configuration (edited by the Manager) is in /var/lib/lemonldap-ng/conf/
- All Perl modules are in the VENDOR perl directory
- All Perl scripts/pages are in /var/lib/lemonldap-ng/
- All static content (examples, CSS, images, etc.) is in /usr/share/lemonldap-ng/
Build your packages
If you need it, you can rebuild RPMs:
- Install rpm-build package
- Install all build dependencies (see BuildRequires in lemonldap-ng.spec)
- Put LemonLDAP::NG tarball in %_topdir/SOURCES
- Edit ~/.rpmmacros and set your build parameters (example for RHEL5):
%_topdir /home/user/build
%dist .el5
%rhel 5
- Go to %_topdir
- Build:
rpmbuild -ta SOURCES/lemonldap-ng-VERSION.tar.gz
